Texas Insturments LaunchPad MSP430
What is LaunchPad?
LaunchPad is a prototyping board from Texas Instruments, for developing Texas instruments microcontrolers(MCU) MSP430G2XXX applications. MSP430G2XXX are one of the cheapest low power 16bit MCUs, also LaunchPad is one of the cheapest prototyping boards on the market, so this is the reason we are using it in the wlan slovenija project. It also runs at the same voltage level as most of routers(3.3V-3.6V).

The PCB is made from good quality 1.5mm thick double sided PCB, with red soldermask. Holes and pads are metalized and tinned. All the components are on the top side. The PCB has 4 rubber stick pads on the bottom, whitch make it sit nicely on a flat surface. The PCB is made from two main parts, the emulation and the prototyping.
The prototyping part is where the target MCU is.
It consists of:
-DIL20 socket,
-Male pin headers (in newer versions they are presoldered, but they are not presoldered in older versions),
-There are two LEDs (red and green) you can disconnect using jumpers,
-There are supply pins,
-Reset button,
-Button conected to MCUs GPIO(P1.3),
-Jumpers (for LEDs and for connecting emulation part of the board),
-Some electronics needed by MPU
-Pads for soldering external quartz crystal oscillator(you get one 32kHz quartz with LaunchPad)
The emulation part of PCB is connected to prototyping part via jumpers you can disconnect.
The connection consists of:
-Power lines,
-Two wire JTAG interface
-Serial UART interface.
UART operates at 9600bps fixed baudrate, which might be annoying since routers operate usualy at 115200bps so debuging serial is totaly useless.
The emulation part is populated with:
-MSP430F1612IPMR MPU,
-TUSB3410 USB to serial converter,
-TPD2E001 ESD/EMI protection chip,
-TPS77301 Voltage regulator(3.6V),
-AT24C128 128k two-wire serial EEPROM (sometimes it might also be an microchip branded EEPROM),
-Green power indicating LED,
-Jumpers(connected to prototyping part of the board),
-0402 package resistors and capacitors, micromelf diode(1N4148) and 12MHz quartz crystal.
There are 7 test pads for emulator MCU JTAG programming.
The emulator is connected to PC throught mini USB type B connector.
The emulator outputs 2 jtag programing wires, 9600baud UART and power(3.6V). Emulator can be almost completly(only thing you can't disconnect is GND signal) disconected from prototyping board via. jumpers
When powered from USB, circuitboard operates at 3,6V.
What is in the box?
-LaunchPad Development board (MSP-EXP430G2)
-Mini USB cable(50cm old version supplyes gray cable, new version supplyes black)
-2x MSP430 flash devices:
with old version:
MSP430G2211IN14 MCU
MSP430G2231IN14 MCU (preloaded with sample program)
with new version:
MSP430G2452IN20 MCU
MSP430G2553IN20 MCU (preloaded with sample program)
-10-pin PCB Connectors (in old version: 2 male & 2 female, in new version male are presoldered)
-32kHz crystal (MS3V-T1R 32.768kHz CL: 12.5pF +/-20ppm, microcrystal.com)
-Quick Start Guide
-2x LaunchPad stickers
What software do I need?
Because we want to keep source compatible, we are using Code Composer Studio. It's free compiler/GUI for developing Texas Instruments CPUs.
Some source codes: For starting with launchpad you can start of by checking out preloaded sample source code, to get feeling with sintax. When you feel comfy in CCS you can download telemetry source from github. There you will find 1wire interface with DS18B20 temperature sensor, i2c interface, serial interface and more. Fell free to modify and upgrade the code and report it to chat.
Testing serial interface(Emulator)
After you installed Code Composer studior, you can test out serial interface by creating loopback. Before proceding you should make sure your LaunchPad is correctly recognized by computer. For windows you open up device maneger, and under category "ports(COM & LPT)" or for slovene "vrata(COM in LPT)", you should find there device named "MSP430 Application UART (COM#)"(# indicates number of COM port). Remember COM port number for later when we will connect to it.
For this task you disconnect all the jumper bridges on J3 jumper.
Than we bridge emulators RX and TX pins. note that there is a slight pinout difference betwen old and new version of launchpad.
when using new launchpad, you will need jumper wire, but with old one you can connect pins via. jumper bridge.
CONNECTIONS:

Note the slight difference in pinout, pins were rearanged in new version to ease the support for chips with hardware UART
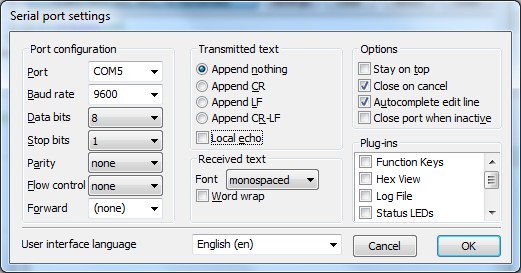
When you connected RX and TX open serial terminal of your taste(putty, termite...), connect to selected com port and turn of SW feedback. When you have wires connected you should get feedback, but not when you disconnect them.
SETTINGS FOR TERMITE:

SETTINGS FOR PUTTY:

Connecting DS18B20 thermometer
First download MSP430-telemetry source from github. Connect everything acording to picture:

If you want to use internal pull-ups, in CCS modify file bitbang_1w.c. Press CTRL+F, this will open Find/Replace dialog.
Do it like on the picture and press Replace All

Now open up putty or termite or any other serial terminal, connect to proper port and send following command:
1w scan_read
If everything is okay you should get back something like:
OK:1 1-wire devices:
1WIRE DS18B20 28004224030000ee 27.75
Note that number next to addres is temperature in °C (27.75 in example).
More documentation:
-Quick Start Guide for LaunchPad
-User's Guide for LaunchPad(including schematic!)
-MSP430G2xx User's Guide
-LaunchPad Bill of Materials (BOM)
-official wiki
Attachments
-
CONNECTIONS.png
(6.3 KB) -
added by kablek 13 years ago.
loopback connections
-
TERMITEsettings loopback.png
(42.6 KB) -
added by kablek 13 years ago.
Settings for loopback, termite
-
PUTTYsettings loopback.png
(38.5 KB) -
added by kablek 13 years ago.
Settings for loopback, putty
-
20100512040513!LaunchPad_wireframe.PNG
(1.1 MB) -
added by kablek 13 years ago.
launchpad
-
EnablingInternalPullups.png
(23.9 KB) -
added by kablek 13 years ago.
Enabling internal pull-ups
-
MSP430connectionsheetDS18B20.png
(47.8 KB) -
added by kablek 13 years ago.
DS18B20 connection